Risify Discover (Related Search) feature in Risify adds a suggestion row to your collection pages. It displays short, clickable items that link to other collections or products you select, so shoppers can jump to adjacent topics, accessories, or alternatives without typing a query.
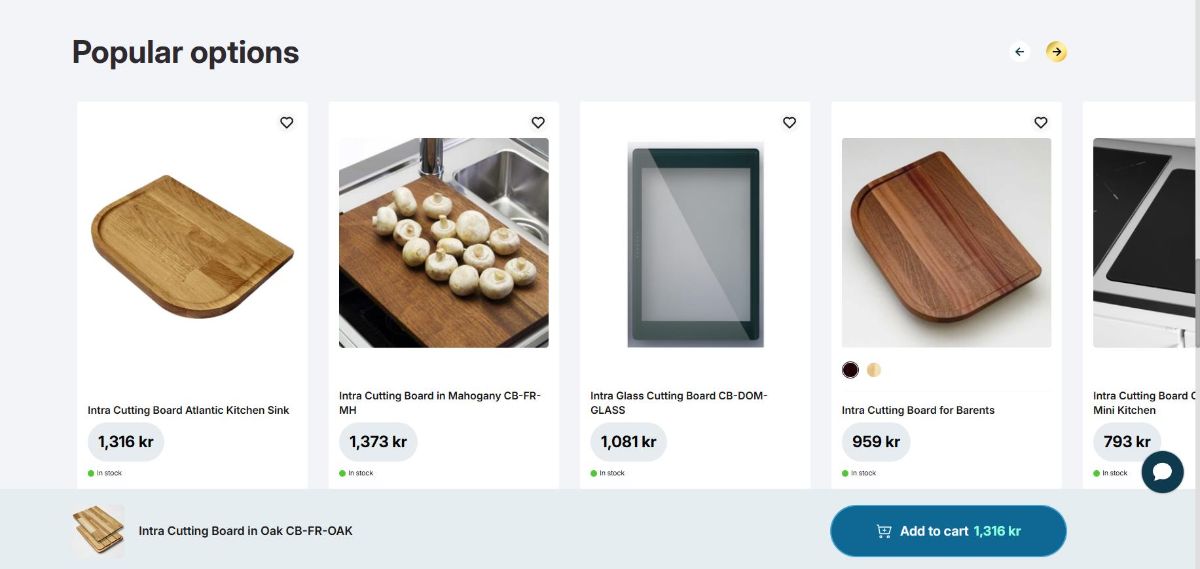
For example, if a customer is viewing “Corner Sofas,” they can quickly switch to “Two-Seater Sofas” or “Sofa Beds” directly from the page.
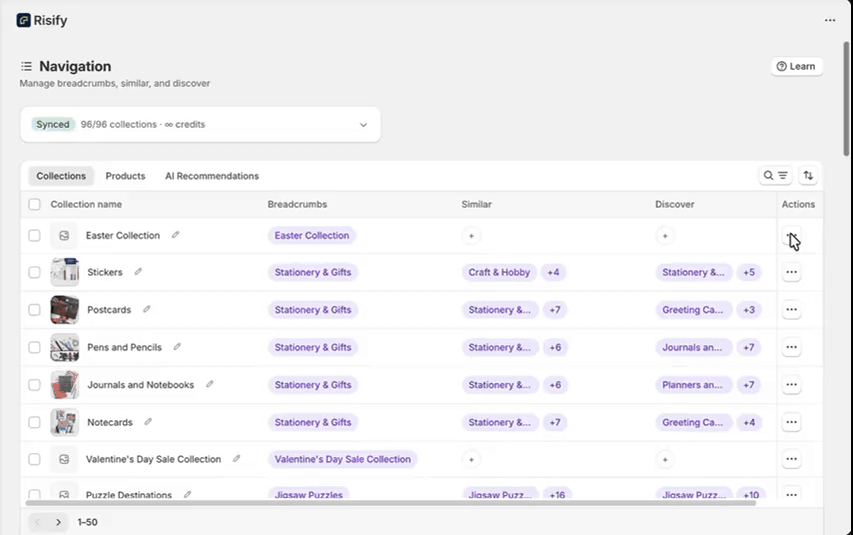
Note: Risify Discover (Related Search) is managed under the Navigation tab in Risify , alongside the Breadcrumbs and Similar features.

What You Can Do With Risify Discover (Related Search)
- Improve user experience: Shoppers can switch between related collections easily without extra navigation steps.
- Strengthen SEO: Internal linking between related collections helps search engines understand category relationships.
- Increase engagement: Reduces bounce rates by giving users more browsing paths within your store.
Two Phases of Setup
Setting up Risify Discover (Related Search) requires two phases:
- Phase 1 (Admin): Enable Risify Discover (Related Search) and define which collections appear together. You control the items and their order.
- Phase 2 (Theme): Add the Risify Discover (Related Search) section to your collection template in the Theme Editor. Style the tiles, text, and colors to match your store.
If you finish Phase 1 and do not see the menu on your storefront yet, complete Phase 2 to make it visible.
Phase 1: Enable and Define in Admin
In this phase, you configure which collections appear in each Risify Discover (Related Search).
Step 1: Open the Navigation Tab
In your Shopify admin, go to Apps, open Risify, and click Navigation. Go to the Collections tab. You will see a Risify Discover (Related Search) column that shows whether each collection already has a Discover menu configured.
Step 2: Edit Discover
Find the collection you want to edit. In the Actions column, click the three-dot menu and select Edit Risify Discover (Related Search). A popup will open where you can build the menu:
- In the search field, type the name of the collections you want to include and select them from the list.
- Added collections will appear in a preview showing how they will display on the storefront.
- Drag and drop to reorder the menu items as needed.
- Click Save.
You have now created a Discover menu for that collection. Repeat this for other collections as needed.
Tip: You can also use Risify’s AI Generator to create Risify Discover (Related Search) automatically. Click the Generate button in this section to use 1 AI credit per item.
What Happens Next
Your Risify Discover (Related Search) is saved in Risify’s admin. In Phase 2, you will add the section to your Shopify theme and customize its appearance.
Phase 2: Display and Customize in the Theme Editor
In this phase, you add the Risify Discover (Related Search) section to your collection template and style it to match your store.
Step 1: Open the Collection Template in the Theme Editor
In Shopify admin, go to Online Store, find your theme, and click Customize. Switch to the collection template where you want the Risify Discover (Related Search) to appear, and navigate to a collection where you configured Risify Discover (Related Search) in Phase 1.
Step 2: Add the Risify Discover (Related Search) Section
- In the left sidebar, click Add Section. Switch to the Apps tab and select Risify - Discover.
- If the section appears at the bottom, drag and drop it to your preferred position. Many stores place it under the hero banner so visitors see it immediately.
Step 3: Configure the Section Settings
Use the left sidebar to style how the Risify Discover (Related Search) looks and behaves.
General
- Item Count: Sets how many items are visible at once. Extra items become scrollable.
- Position: Puts the navigation controls at the top or bottom of the row.
- Type: Choose what the tiles show: Text Only, Image + Text, or Icon + Text.
- Section Width: Page follows your theme container width. Screen spans edge to edge.
Card
- Layout: Controls the tile shape. Vertical makes a taller rectangle; Horizontal makes a wider one.
- Border Radius: Rounds the corners of each tile.
- Border Width: Sets the thickness of the tile outline.
Image
- Ratio: Fixes image proportions to 1:1, 3:4, or 16:9 for consistent display.
- Width: Controls the rendered image size inside the tile.
- Border Width and Radius: Adds a frame around the image and rounds its corners.
Content and Typography
- Custom Title: Optional heading above the menu, e.g., “Explore related collections.”
- Custom Description: Short helper text under the title.
- Heading Style: Sets the semantic heading level (H1–H6) for the custom title.
- Font sizes: Adjust pixel size for the title, description, and card titles independently.
- Card Title Alignment: Aligns collection names Left, Center, or Right within each tile.
Colors
- Title and Description: Colors for the custom title and description text.
- Card Style: Choose Outline (thin border) or Filled Shadow (solid tile with subtle depth).
- Card Background: Background color for tiles when using filled styles.
- Card Image Border: Color of the image frame if a border width is set.
Spacing
- Padding Top and Bottom: Adds vertical space above and below the section to separate it from nearby blocks.
Click Save when finished.
Summary
By completing both phases, you set up a complete collection navigation system:
- Phase 1 defines which collections appear together inside Risify’s admin panel.
- Phase 2 adds and styles the menu visually inside your Shopify theme.
Together, these steps ensure that your collection navigation is clear, consistent, and visually integrated with your store’s design.
FAQ: Common Questions Asked About Discover (Related Search) in Risify App
Here are the frequently asked questions about Risify Discover (Related Search) feature in Risify app: